
A Primary DNS (also known as a "master DNS") is a server that acts as the authoritative source for a DNS zone. It allows you to create and manage your records directly, making them available to resolvers across the internet. Essentially, it's where your zone data originates.
A primary DNS is often complemented by one or more Secondary DNS servers. These are also authoritative servers that resolvers can contact, but they maintain a read-only copy of your zone data, received from the primary via a mechanism called a zone transfer.
Combining primary and secondary DNS servers provides redundancy and high availability. If your primary server experiences downtime, the secondary servers continue to answer queries, keeping your website and services online.
A common professional setup is the "Hidden Primary": you maintain a primary DNS server and several secondaries, but only the secondary servers are listed at your registrar. With this architecture, all public traffic is handled by the secondaries, and your primary DNS server remains shielded from the internet, only needing to be accessible when you push updates to the secondaries.
In this article, we'll explore how to configure a primary zone at PTRDNS and integrate secondary servers from another provider.
Create a TSIG key
The first step is creating a TSIG key to secure your zone transfers. While not strictly mandatory, PTRDNS strongly recommends it to prevent unauthorized parties from obtaining copies of your DNS zones. Without TSIG, you would rely on IP-based restrictions, which are significantly less secure and harder to maintain in dynamic environments.
Log on to your account at https://app.ptrdns.net and in the Dashboard click New TSIG Key, then choose an algorithm and a descriptive name. We suggest a naming convention like source-dest-zone to help you manage keys as your infrastructure grows.
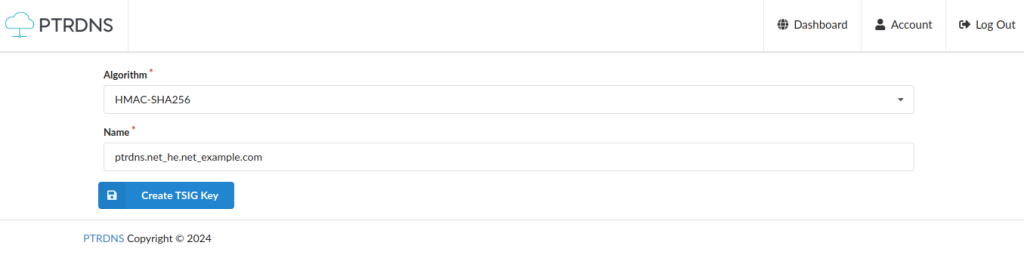
Once the key is created, you're ready to move to the zone creation process.
Create a primary zone and associate the TSIG key
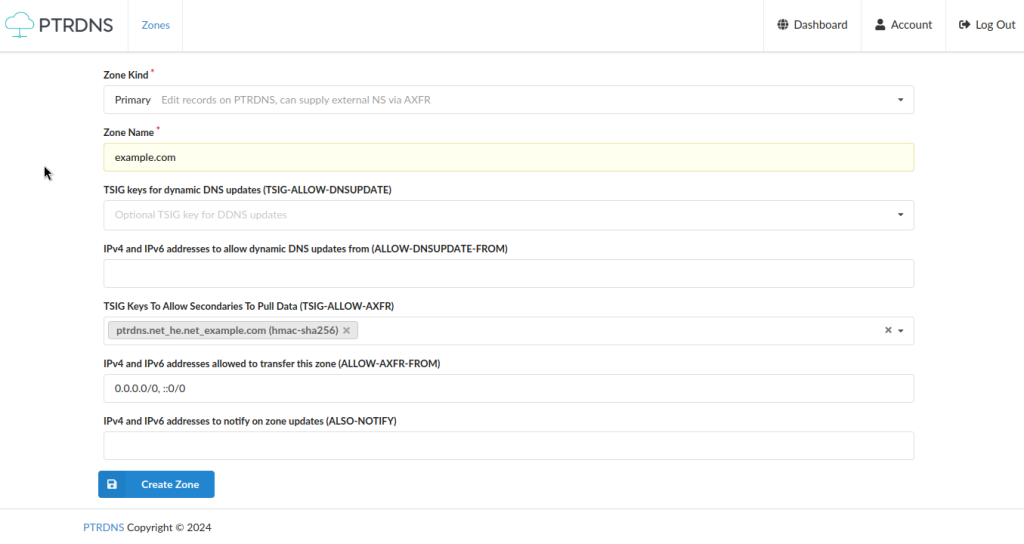
In the Dashboard, click on New Zone and select a primary zone type. In the TSIG-ALLOW-AXFR field,
select the TSIG key you just created. Additionally, you must specify the IP addresses authorized to transfer the zone. By
combining a TSIG key with 0.0.0.0/0 and ::0/0, you allow transfers from any IP address provided the
requester possesses the correct key.
Note: PTRDNS also supports native zones, which are managed via our interface/API and served exclusively by PTRDNS nameservers.
Add records to the primary zone
With the zone created, you can now add your DNS records. Since we want to transfer this zone to another provider (like he.net) and have it served by their nameservers, we must include them in the zone's NS records:
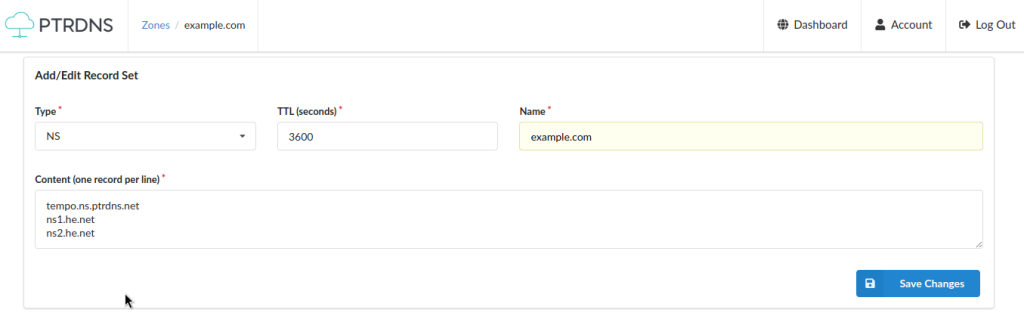
Remember that when editing a record set, you should include all NS values within the Content field.
You can then proceed to add other essential records, such as A records for your web servers and MX records for your mail routing. A completed zone might look like this:
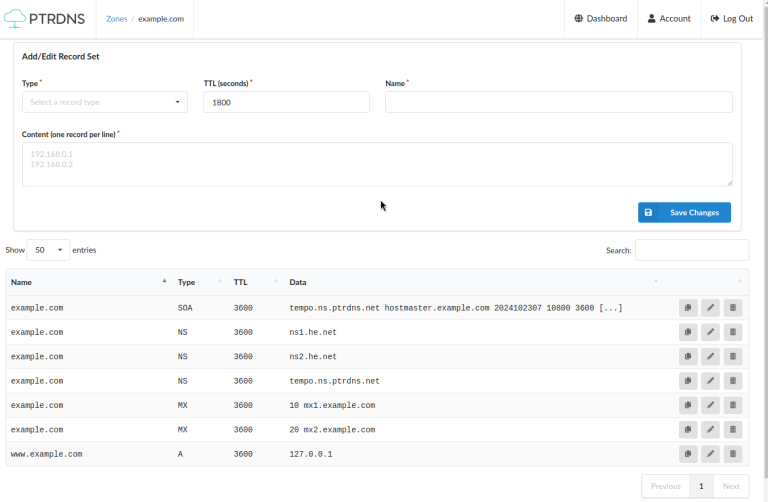
Our zone is now fully configured at PTRDNS. Next, we'll set up the secondary zone at the other provider.
Create a secondary zone at another provider
Log on to your secondary provider's interface (e.g., he.net) and add a new slave or secondary zone. Enter the primary nameserver
address—in this case, tempo.ns.ptrdns.net—and provide the TSIG key details copied from your
PTRDNS dashboard. Ensure the hash algorithm, key name, and hash value match exactly to enable successful transfers.
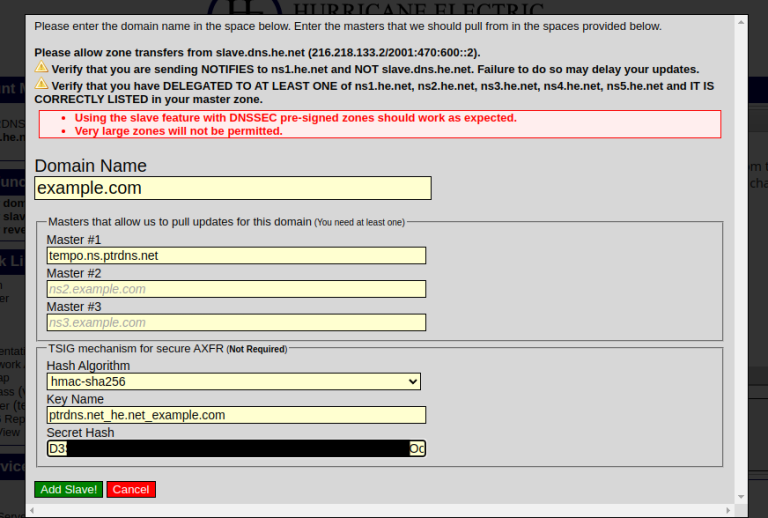
After a short delay, verify that the zone data has synchronized. Crucially, you must update your domain registrar to use the exact nameservers specified in your NS records, ensuring that resolvers can find your authoritative servers.
Bonus: Enable DNSSEC
Enabling DNSSEC on a primary zone at PTRDNS is remarkably simple. Even if your secondary DNS provider doesn't explicitly support DNSSEC management, the signatures and DS records will propagate to them via AXFR.
In the PTRDNS Dashboard, simply click the padlock icon for your zone and select Enable DNSSEC.
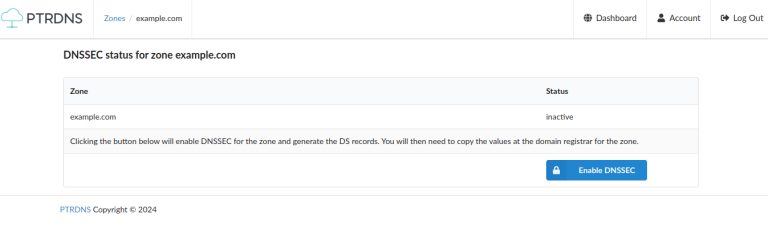
PTRDNS will sign your zone and provide the DS records. Copy these values to your registrar to complete the chain of trust. Your zone will then be secured across all nameservers.
We hope this guide helped you build a more resilient DNS infrastructure. With PTRDNS, you can enjoy professional features like large query quotas, short TTLs, and PowerDNS API support, starting from just 5 EUR per month.